- Bolt
Build a restaurant website with Bolt
Use Bolt and the Fazekit Restaurant template to launch a site with your menu, opening hours, reservations and location.
Beginner 4 min read7 steps
Bolt (bolt.new) is an AI builder that runs a complete development environment in your browser. You chat, it writes the code and shows a live preview — and when you're happy, it can publish the site for you.
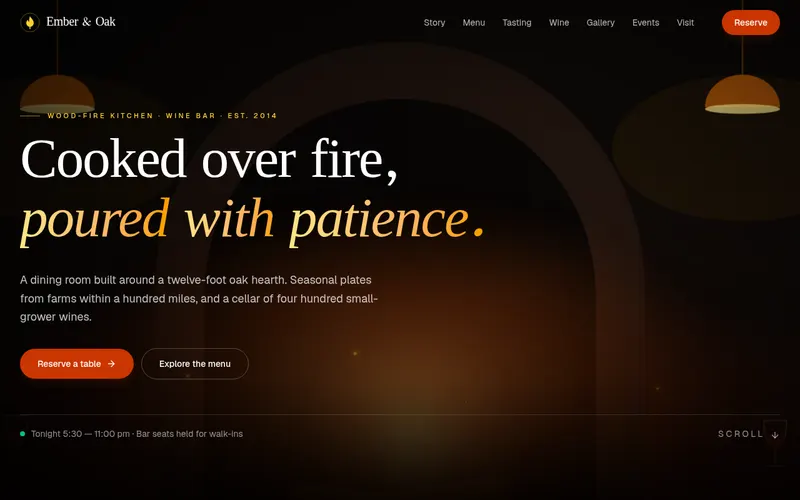
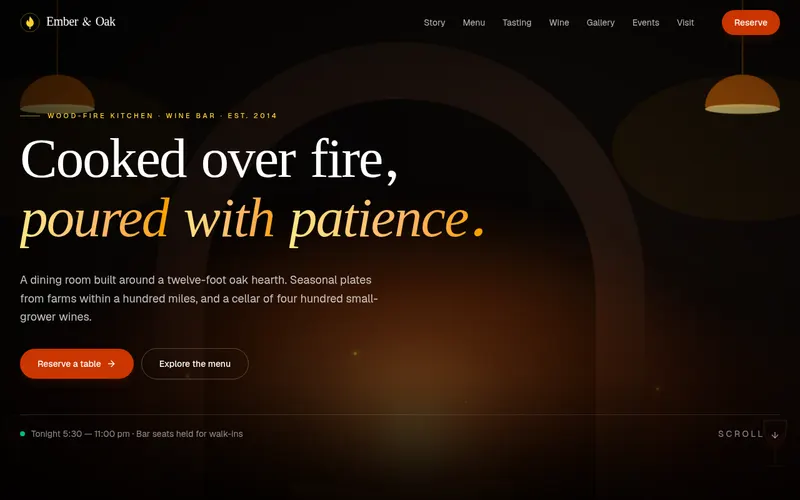
Restaurant sites have a lot of small details — menu items, prices, allergens, hours, a map. The Fazekit Restaurant template already has all the sections a restaurant needs, so you only have to fill in your own information.
What you'll build
- A restaurant website with a hero, your story, a tabbed menu, tasting menu, wine list, gallery, reservation form, events, reviews and location.
- Your restaurant's name, menu, prices, hours and address.
- A published site with a link you can put on Google Maps, Instagram and your menu cards.
Before you start
- A free Bolt account.
- Your menu (a photo or document is fine — you'll type or paste it), opening hours and address.
- About 45 minutes.
Step 1: Collect your restaurant's details
Having everything in one place makes the prompts easy. Put this in a text file:
- Name, type of cuisine and a two-sentence story.
- Menu: sections (starters, mains, desserts, drinks), dish names, one-line descriptions, prices.
- Allergen or diet labels you use (vegetarian, vegan, gluten-free).
- Opening hours, address, phone, email, social media links.
- How reservations work today: phone, email or a booking service.
Step 2: Copy the prompt for Bolt
Open the Restaurant template. In Build with AI choose Bolt and describe your restaurant in the Describe your project field, for example:
Example description Neighbourhood trattoria “Nonna Rosa” in Kraków, handmade pasta and natural wines, warm red and cream colours, prices in PLN
Then click Copy prompt for Bolt. If the panel shows several parts, copy and send them one by one in the next step.
Step 3: Start a Bolt project and paste
- Open Bolt and start a new project. If it asks for a stack, choose React with Tailwind CSS (a Vite project is fine).
- Paste the prompt (or part 1) into the chat and send it.
- If there are more parts, send each one after Bolt confirms it received the previous one.
- Wait for Bolt to install packages and build. The preview appears when it's done.
Step 4: Put in your real menu
The template keeps all its content in one data file, so the AI can replace the menu without touching the design. Paste your menu into this prompt:
Replace the menu Replace the demo menu with my menu below. Keep the tabs and the design. Use these tabs: [Starters, Pasta, Mains, Desserts, Drinks]. Mark vegetarian (V), vegan (VG) and gluten-free (GF) dishes with small labels. [paste your menu here — dish, description, price]
Tasting menu and wine Change the tasting menu to [5] courses at [price] per person, wine pairing [price]. Replace the wine list with: [paste wines]. If I don't have a wine list, remove the wine section.
Step 5: Hours, location and reservations
Hours and address Update the location section and footer with: address [street, city], phone [number], email [address], opening hours [Mon–Thu 12–22, Fri–Sat 12–23, Sun closed]. Add a “Get directions” button that opens Google Maps for this address.
The reservation widget in the template is a demo — it looks and behaves like the real thing but doesn't send the booking anywhere yet. Pick what fits you:
Simplest: email or phone Make the reservation form send the booking as an email to [[email protected]] by opening the visitor's email app with the date, time, number of guests and name filled in. Also show our phone number [number] next to the form.
Existing booking service Replace the reservation widget with a button “Book a table” that opens [your booking page link] in a new tab. Keep the section's heading and background.
Step 6: Add your own photos
The template uses drawn food illustrations so it looks good without photos. When you have your own pictures, upload them into the Bolt project (you can drag files into the chat or the file tree, at the time of writing) and ask:
Prompt Use the images I uploaded in the gallery and the hero background: [file names]. Keep the lightbox. Compress them for the web and add descriptive alt text for each photo.
Step 7: Publish the site
Bolt can deploy your project with its publish/deploy action and gives you a free web address. At the time of writing it uses a hosting partner behind the scenes; follow the on-screen steps.
After it's live, add the link to your Google Business profile and social media. For a custom domain like
nonnarosa.pl, see Publish your site and connect your own domain.
Keep going
Start your restaurant site
Open the Restaurant template, choose Bolt in “Build with AI”, describe your restaurant and copy the prompt.
Open Restaurant — Build with AINext guide
Customise any template with one sentence
How the “Describe your project” field works, what makes a good description, and follow-up prompts to fine-tune the result in any AI tool.
← All guides·Last reviewed 24 September 2026